Last updated on May 1st, 2024 at 05:02 pm
Yoga is practice sets of asana and mudras to help your body and mind in self-conscience, evaluate, revive, and freedom from suffering. Yoga is a form of art to achieve health, harmony, and self-realization.
Yoga is a full body work that plays a key role in improving our health, there are many physical workouts available for the body like dancing, exercise, Zumba, gym, aerobics, and swimming, but yoga is an ancient art of our culture balancing our body mind and emotion together, a perfect union of body and mind.
Yoga is a control of breathing body posture practicing of asanas mudras and meditation to keep your body and mind flexible, and disease-free, reduce stress, and establish a connection between body and mind.
Why is Yoga Beneficial for Diabetes Patients?
Diabetes is a chronic disease faced by most of the world’s population. It is a metabolic diseases that fluctuate blood sugar levels and causes serious issues related to kidney, joint pains, blood pressure, heart, and many more. Diabetes is an issue related to insulin which is produced by the pancreas.
There are 2 types of diabetes type-1 or type-2 the most common type is type-2 and most people are affected by this type of diabetes. The treatment of diabetes is most costly and not affordable for everyone and the meditation of this is quite long and most of the time it continues for a lifetime.
But do not worry yoga is an effective science for this chronic disease of diabetes you can get rid of diabetes or levels your blood sugar by practicing yoga. There are many yoga poses asanas and mudras that will help you control your insulin level, and reduce your diabetes, it is a simple and easy practice you can add to your daily routine and make your body diabetes free and live your life like a normal person.
Best Yoga Asanas for Diabetes
There are many asanas and poses for diabetes patients, a basic understanding of yoga is necessary for everyone, and beginners are important to practicing yoga. This article suggests simple and easy yoga asanas for diabetes patients and also how to reduce or prevent yourself from diabetes.
Some of the below yoga poses can also be beneficial in Thyroid Health.
1. Sun Salutations (Surya Namaskar)
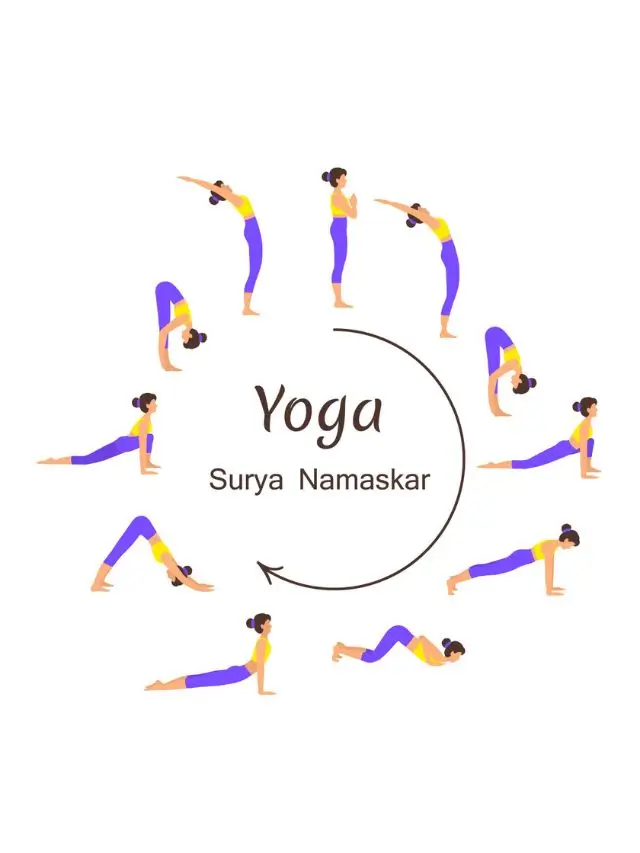
How To Do Sun Salutations (Surya Namaskar)
- Start with a prayer pose, palms together.
- Inhale, raise arms, arch back.
- Exhale, bend forward, touch toes.
- Inhale, step right leg back, arch back.
- Exhale, step left leg back, plank position.
- Lower knees, chest, and chin to the floor.
- Inhale, lift your chest into the Cobra pose.
- Exhale, and lift your hips into Downward Dog.
- Inhale, step right foot forward, arch back.
- Exhale, step left foot forward, touch toes.
- Inhale, raise arms, arch back.
- Exhale, return to prayer pose.
Muscles Worked:
- Core
- Legs
- Arms And Shoulder
- Back
- Hips
Concerns For Diabetes Patients Doing Surya Namaskar
- Surya Namaskar can affect blood sugar levels.
- Some poses may be tough for diabetes patients with joint or muscle issues.
- To avoid dehydration, diabetes patients should drink water regularly.
- If you feel dizziness or sweating while doing surya namaskar, your blood sugar levels change. Please consult your doctor before performing any exercise.
2. Legs-Up-the-Wall Pose
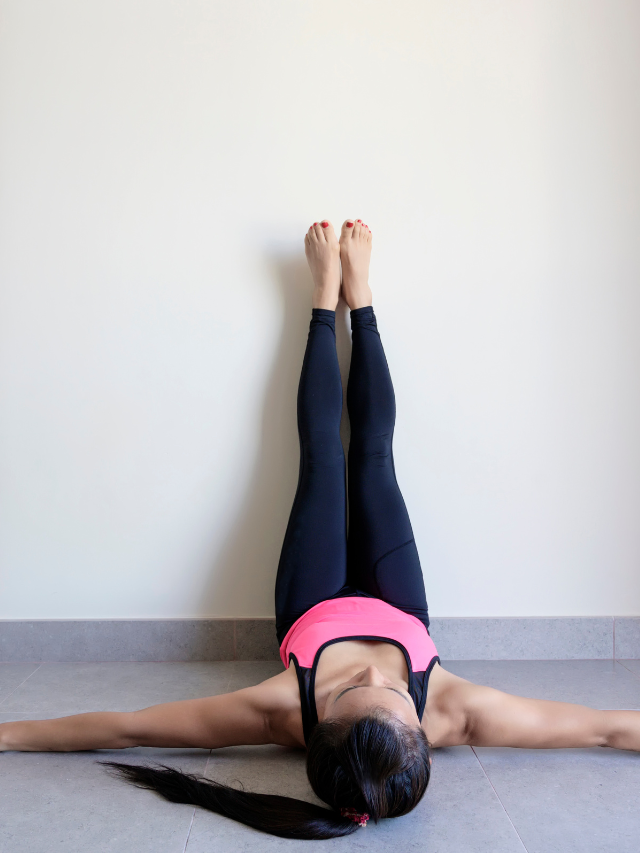
How To Do Legs-Up-the-Wall Pose
- Find an open wall space.
- Sit sideways with your right hip against the wall.
- Gently lower your back to the floor as you swing your legs up the wall.
- Adjust your body so that your buttocks are as close to the wall as comfortable.
- Keep your arms relaxed by your sides or place them in a comfortable position.
- Close your eyes, relax your body, and focus on your breath.
- Stay in the pose for 5-15 minutes, or as long as is comfortable.
- To come out of the pose, bend your knees and roll to one side before slowly sitting up.
Muscles Worked:
- Back Of The Legs
- Calf Muscles
- Lower Back
- Hip Area
Concerns For Diabetes Patients Doing Leg Up The Wall Pose
- Lifting the legs on the wall could put pressure on the belly area, which might affect digestion and blood sugar.
- Watch for any tingling or numbness in the legs, which means, there are blood circulation issues.
- Always consult your doctor before trying new yoga poses.
3. Seated Forward Bend
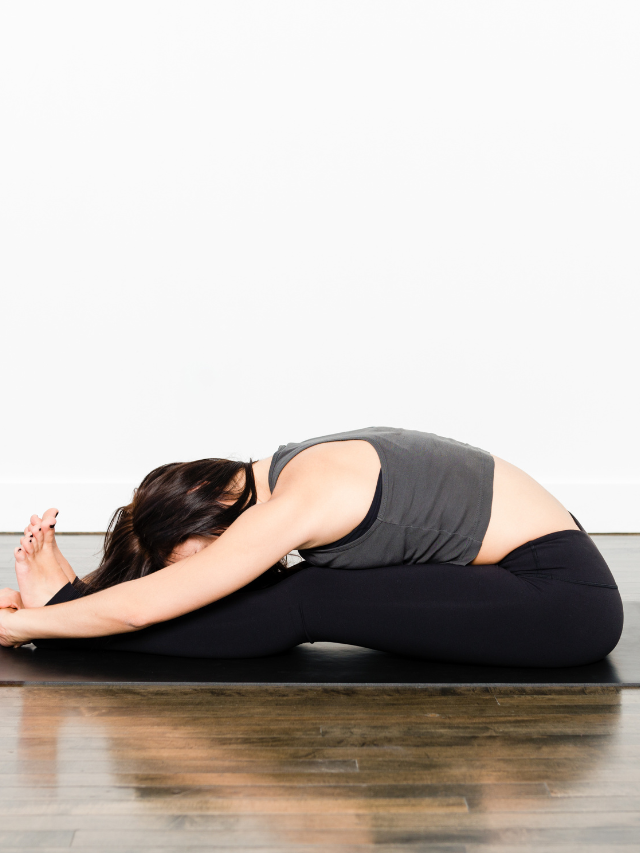
How To Do Seated Forward Bend
- Sit on the floor with your legs extended straight in front of you.
- Sit up tall, lengthening your spine, and engage your abdominal muscles.
- Inhale and reach your arms overhead.
- Exhale and hinge at your hips, slowly folding forward from your hips rather than rounding your back.
- Keep your spine straight as you reach your hands toward your feet or shins. If you can’t reach your feet, hold onto your shins or use a yoga strap around the soles of your feet.
- Relax your neck and allow your head to hang heavy.
- Keep your legs engaged by flexing your feet and pressing your heels into the floor.
- Hold the stretch for 30 seconds to 1 minute, breathing deeply and relaxing into the pose.
- To release, inhale and slowly lift your torso back to an upright position.
- Repeat the stretch.
Muscles Worked:
- Hamstrings
- Lower Back
- Buttocks
- Spine
Concerns For Diabetes Patients Doing Seated Forward Bend
- Bending forward can press the belly, which might affect digestion and blood sugar.
- Some diabetes patients may find it difficult to bend forward comfortably due to stiffness.
- This pose could make you dizzy, especially if your blood sugar isn’t stable.
4. Reclining Bound Angle Pose

How To Do Reclining Bound Angle Pose
- Lie on your back on a yoga mat or comfortable surface.
- Bend your knees and put your feet together, then let your knees fall to the sides.
- Keep your heels close to your pelvis.
- Allow your arms to rest comfortably by your sides with your palms facing up.
- Relax your shoulders and lengthen your spine along the floor.
- Close your eyes and take deep, slow breaths, focusing on relaxing your body.
- You can hold this position for 1 to 5 minutes, or longer if it feels good, to let your body slowly open up.
- To exit the position, softly bring your knees together and roll to one side before slowly sitting up.
Muscles Worked:
- Inner Thighs
- Groin
- Hips
- Lower Back
Concerns For Diabetes Patients Doing Reclining Bound Angle Pose
- Bringing the feet together might press on the belly, which could affect digestion and blood sugar.
- Diabetes patients may find it hard to get into or stay in this pose due to mobility problems.
- This pose might cause discomfort in the hips or lower back.
5. Supported Shoulder Stand
This pose is also helpful in Thyroid Health
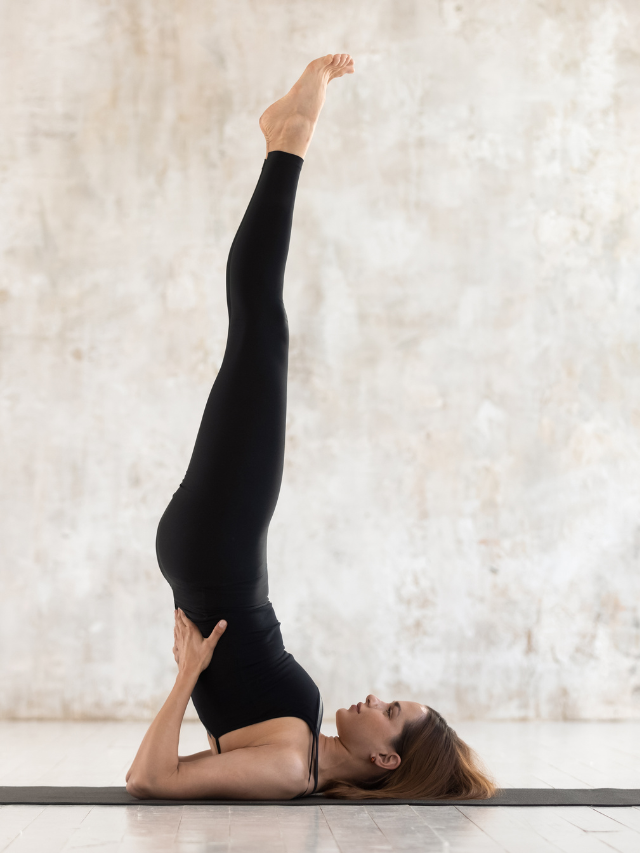
How To Do Supported Shoulder Stand
Muscles Worked:
Concerns For Diabetes Patients Doing Supported Shoulder Stand
- Holding your body on your shoulders could strain your neck and affect blood flow to your head.
- Due to stiffness and mobility issues, diabetes patients might find it hard to do it.
- If your blood sugar levels are unstable, lying upside down makes you feel dizzy.
6. Upward-Facing Dog

How To Do Upward Facing Dog
- Lie your face down on your yoga mat with your legs extended behind you and the tops of your feet resting on the mat.
- Place your hands on the mat beside your ribs, fingers pointing forward and slightly wider than shoulder-width apart.
- Press firmly into your palms and engage your arm muscles as you lift your chest and torso off the mat, straightening your arms.
- Keep your shoulders relaxed and away from your ears, and your elbows close to your body.
- Press the tops of your feet into the mat to lift your thighs off the ground.
- Keep your legs active and your knees off the mat, with only the tops of your feet and your hands touching the ground.
- Lift your chest and gaze forward, lengthening your spine and opening your heart.
- Hold the pose for a few breaths, maintaining a strong, active body.
- To release, exhale and lower your chest and torso back down to the mat, returning to the starting position.
Muscles Worked:
- Back
- Abdomen
- Chest
- Hips
Concerns For Diabetes Patients Doing Upward Facing Dog
- Arching your back could strain it, especially if it’s sensitive.
- Do it with ease, especially if you are tired
- Holding your body on your hands for a longer time could strain your wrists.
7. Plow Pose
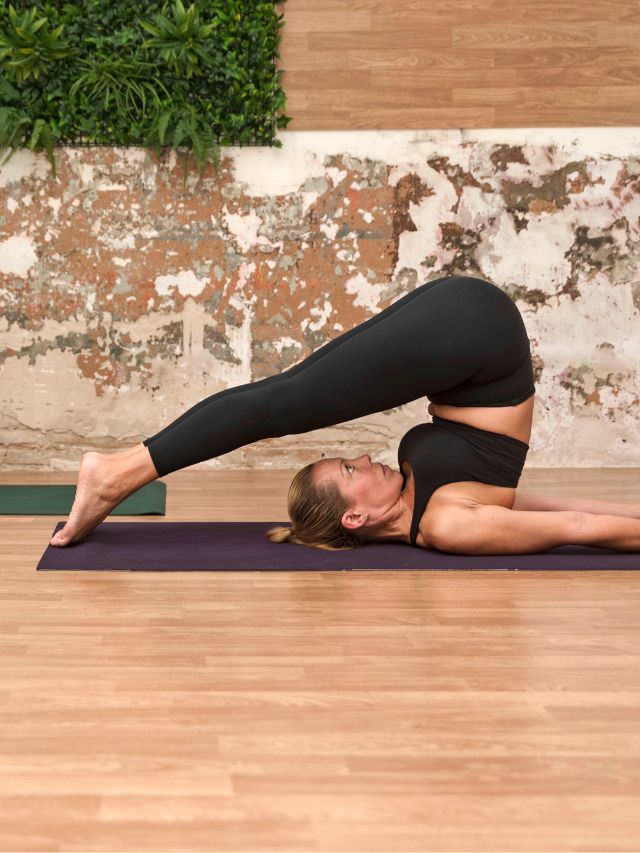
How To Do Plow Pose
- Lie on your back on a yoga mat or soft surface.
- Extend your arms along the sides of your body, palms facing down.
- Inhale deeply and engage your abdominal muscles.
- As you exhale, use your core strength to lift your legs off the floor and bring them over your head, towards the floor behind you.
- Keep your legs straight and try to bring your toes to the floor behind your head.
- Support your lower back and hips with your hands, placing your palms on your lower back or holding onto your hips.
- Keep your neck long and avoid turning your head from side to side.
- Hold the pose for 30 seconds to 1 minute, breathing deeply and evenly.
- To come out of the pose, use your hands to support your back as you slowly roll your spine down to the mat.
- Once your legs are back on the floor, extend them straight and relax in Corpse Pose.
Muscles Worked:
- Back And Neck
- Shoulders
- Legs
- Abdominals
Concerns For Diabetes Patients Doing Plow Pose
- Being in this pose might make it hard to breathe, so be careful.
- Putting your legs over your head could strain your neck.
- Due to stiffness or limited body movement, some diabetes patients might find it tough to do this pose or stay in this pose.
8. Bow Pose
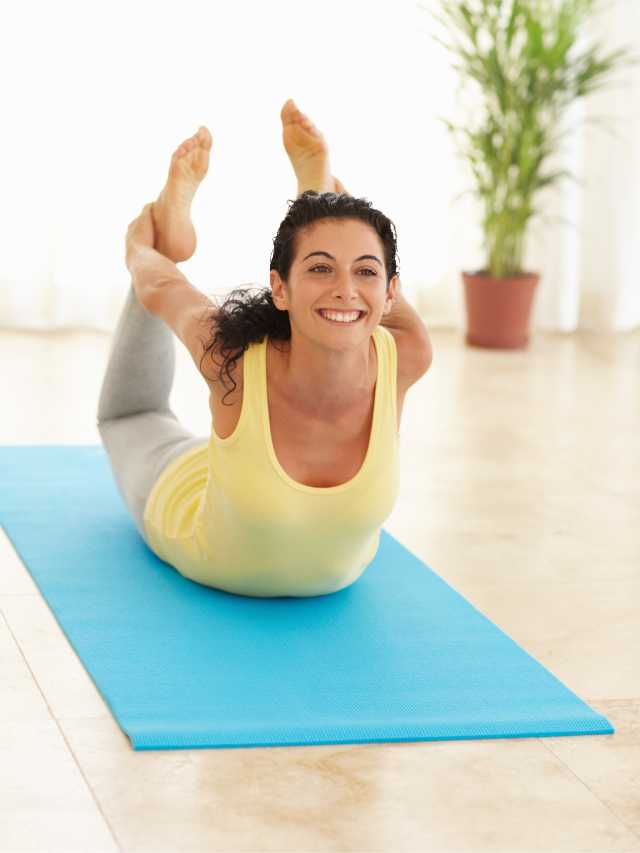
How To Do Bow Pose
- Lie on your stomach on a yoga mat or soft surface.
- Keep your arms alongside your body, palms facing up.
- Bend your knees and bring your heels towards your buttocks, keeping them hip-width apart.
- Reach back with your hands and grasp your ankles.
- Inhale deeply and lift your chest and thighs off the mat by pressing your feet into your hands.
- Keep your gaze forward and your neck in a neutral position.
- Lift your thighs as high as you can while simultaneously lifting your chest and upper body.
- Keep your shoulders relaxed and away from your ears.
- Hold the pose for 20-30 seconds, breathing deeply and evenly.
- To release, exhale and gently lower your chest and thighs back down to the mat.
- Extend your legs and relax in Corpse Pose (Shavasana) for a few breaths.
Muscles Worked:
- Back
- Shoulder And Chest
- Thighs
- Hips
Concerns For Diabetes Patients Doing Bow Pose
- If you have a back problem, arching your back could strain it.
- Due to stiffness or limited body movement, some diabetes patients might find it tough to do this pose.
- Being in this pose might make it hard to breathe, so be careful.
9. Supine Spinal Twist
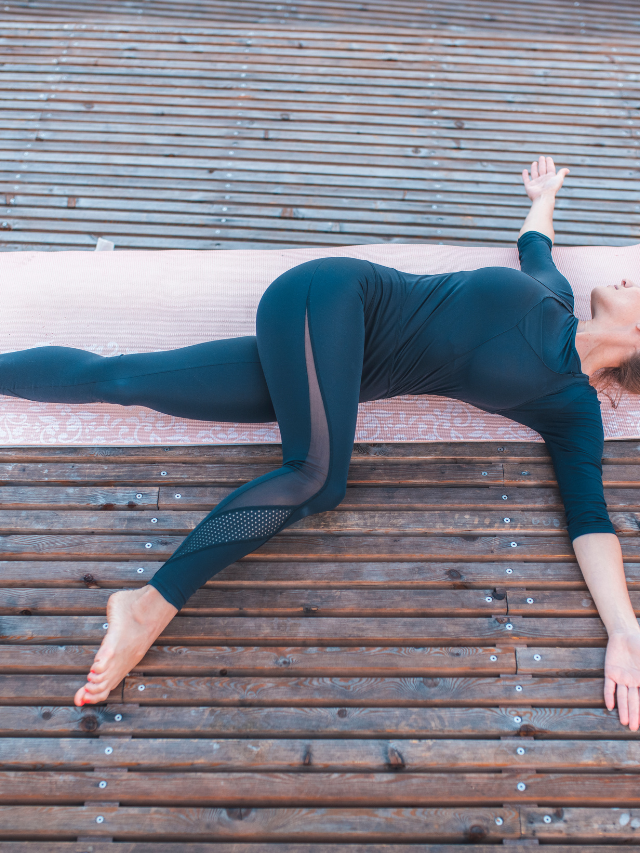
How To Do Supine Spinal Twist
- Lying on your back on a yoga mat or soft surface.
- Extend your arms out to the sides at shoulder height, palms facing down.
- Bend your knees and bring them towards your chest.
- Exhale and lower both knees to the right side of your body, keeping them stacked.
- Keep your shoulders grounded on the mat and gaze toward your left hand or in the opposite direction of your knees.
- Allow your spine to twist gently, feeling a stretch through your lower back and spine.
- Hold the pose for 30 seconds to 1 minute, breathing deeply and relaxing into the twist.
- Inhale, engage your core and slowly bring your knees back to the center.
- Exhale and repeat the twist on the opposite side, lowering your knees to the left while keeping your shoulders grounded.
- Hold the pose for the same amount of time on this side.
- To release, inhale and bring your knees back to the center.
- Extend your legs and relax in Corpse Pose (Shavasana) for a few breaths.
Muscles Worked:
- Back
- Abdominals
- Hips
- Shoulders
Concerns For Diabetes Patients Doing Supine Spinal Twist
- Some diabetes patients may find it difficult to twist fully due to mobility issues.
- Twisting might affect your breathing, so be aware of any discomfort.
10. Child’s Pose
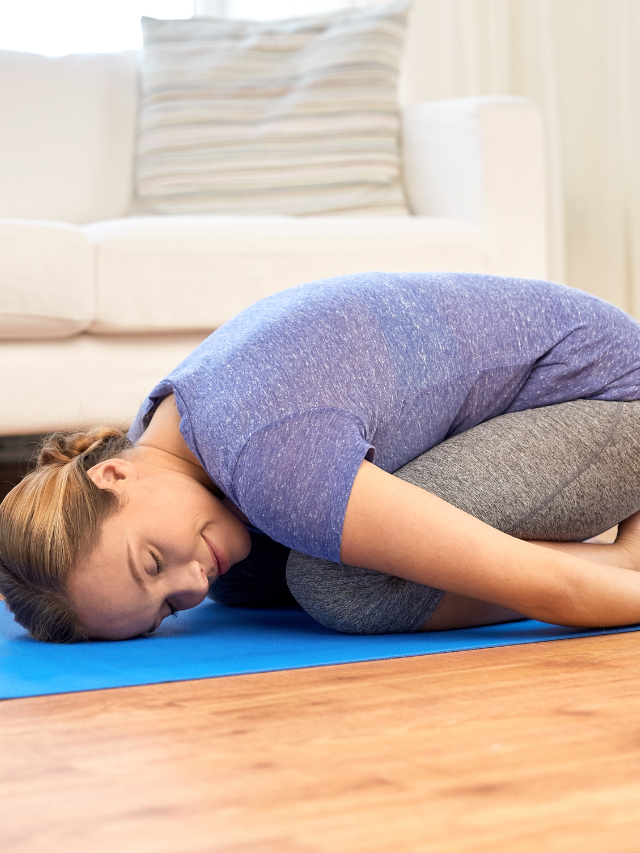
How To Do Child’s Pose
- Start by kneeling on your yoga mat with your knees hip-width apart.
- Sit back on your heels and bring your big toes together, allowing your knees to widen slightly.
- Exhale and lower your torso forward, resting your forehead on the mat.
- Extend your arms forward or alongside your body, palms facing up, and relax your shoulders.
- Allow your chest to rest on or between your thighs, and let your belly soften as you breathe deeply.
- Press your hips back towards your heels to deepen the stretch in your lower back and hips.
- Hold the pose for 1 to 3 minutes, or longer if comfortable, breathing deeply and surrendering to the pose.
- To release, gently walk your hands back towards your body and slowly roll up to a seated position.
Muscles Worked:
- Back
- Shoulders
- Hips
- Thighs And Legs
Concerns For Diabetes Patients Doing Child Pose
- Sitting back on your heels could hurt your knees or hips.
- Being in this pose might make it hard to breathe.
- Some diabetes patients might find it hard to sit back comfortably because of stiffness.
11. Corpse Pose

How To Do Corpse Pose
- Lie down on your back on a yoga mat or soft surface.
- Extend your legs out straight and allow them to relax.
- Place your arms alongside your body, slightly away from your torso, with palms facing up.
- Close your eyes gently and allow your entire body to relax.
- Take a few deep breaths, inhaling through your nose and exhaling through your mouth, to release any tension in your body.
- Relax your facial muscles, jaw, neck, shoulders, arms, torso, hips, legs, and feet.
- Allow your mind to become still and focus on your breath, feeling the rise and fall of your chest with each inhale and exhale.
- Remain in this pose for 5 to 15 minutes, or longer if desired, allowing yourself to completely let go and rest.
- To release, gently wiggle your fingers and toes, then slowly bring movement back into your body.
- Roll onto one side in a fetal position, using your arm as a pillow for your head.
- Take a few breaths here, then use your hands to press yourself up to a seated position.
Muscles Worked:
- It helps to release tension and relax all muscles.
Concerns For Diabetes Patients Doing Corpse Pose
- Lying flat on your back might be uncomfortable, especially if you have back issues.
- Being in this pose might affect your breathing, so take slow, deep breaths.
Watch Our YouTube Video
Does It Work?
Yoga is an effective practice for heel and preventing diabetes it can be beneficial to manage diabetes and its symptoms and improve your lifestyle, reduce your blood sugar level, and improve your metabolism above suggested yoga poses asanas help you in stress relief, improve blood circulation reduce risk related to diabetes like heart, kidney, and stress also. Practicing yoga will help you in diabetes management.
How Often Should I Do Yoga for Diabetes?
Yoga is beneficial in diabetes management and its post effects, many people do yoga for a long time which can keep their blood sugar levels prevent the risk of diabetes-causing disease, and also improve their health and quality of life.
There is no specific limit time for practicing yoga, practice yoga for beginners is for a short time and later you can increase the time day by day, you can do yoga whenever you like but the best practice is in the morning at least 30-45 minutes always listen to your body slowly you can push your level up. For a diabetes patient, it is suggested yoga for 20-25 minutes a day and 3-5 days is enough to control blood sugar to reduce diabetes and get a healthy life.
About The Author

Honey is a certified yoga instructor with training from Patanjali Yogpeeth, Haridwar. With four years of dedicated teaching experience, she specializes in using yoga to improve spinal health, build core strength, and help people find relief from chronic pain. Her mission is to make the transformative power of yoga accessible to everyone.

